This tutorial will show you the steps required to join IVAO as a virtual Air Traffic Controller (ATC). It is meant to give you a short overview about the tools used, and some very basic instructions how to “behave” in this new environment.
1. Registration at IVAO.AERO and Select East Asia Region Division
a. Select divison: “East Asia Region” (NOT China) at the Registration Form
b. 1st email received contains a set of ID and password for Registration Confirmation.
c. 2nd email received after the confirmation contains the following information:
- Your IVAO Member ID
- IVAN Password (For IvAc, IvAp & Teamspeak 2)
- Website Password (For ivao.aero website and IVAO forum)
- ATC / Pilot Rating
2. Download and Install IVAC – IVAO Controller Client
The first thing you need to do is download our ATC client, IvAc, which will allow you to connect to the network.
Once you have downloaded the program, you should run the executable file and install the program.
A manual has been provided, too. Make sure you read it during you first online hours to acquaint yourself with operation of the software.
3. TeamSpeak – ATC Voice Communication
We use the TeamSpeak 2 program for voice communication. Text communication is permitted but voice is preferred.
Teamspeak 2 is included in the IvAc download package, and will be installed automatically during the installation of IvAc.
Important: IVAO is only compatible with TeamSpeak Version 2! Should you have TeamSepak 3 installed already, install our version, too.
Once you have installed and have run Teamspeak, there are some settings you must change. Open Settings → Sound Input/Output Settings.
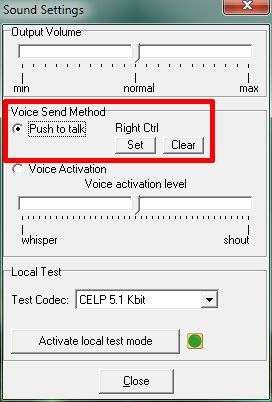
You should select the “Push to talk” method and select a key by pressing “Set”. Here you can see that Mouse btn 2 (mouse scroll wheel) has been selected as the push to talk key. Now, every time you want to transmit to a pilot on the frequency, you must first press the push to talk key, speak and then let go of the push to talk key. Avoid using the “Voice Activation” method as this opens your microphone whenever noise is picked up so background noise and even you breathing, may set it off. You could then be transmitting over the channel without realising it.
4. Download and Load a sector file
A sector file is the “map” displayed on your radar screen. It contains data layers with information about airport location and layout, navigational data like navigational aids, navigation fixes and airways as well as airspace boundaries. Depending on the detail provided, it also shows geographical information like runway/taxiway layout at an airport or coastlines, rivers and roads.
To work at an ATC position, it is essential for you to obtain such a sector file. Once you have joined our division as a controller and logged in our website with your facebook account, you may download our sector file under CONTROLLER RESOURCES -> SECTOR FILE & SOFTWARE. Remember to read through our Manual of Hong Kong Sector File before download:
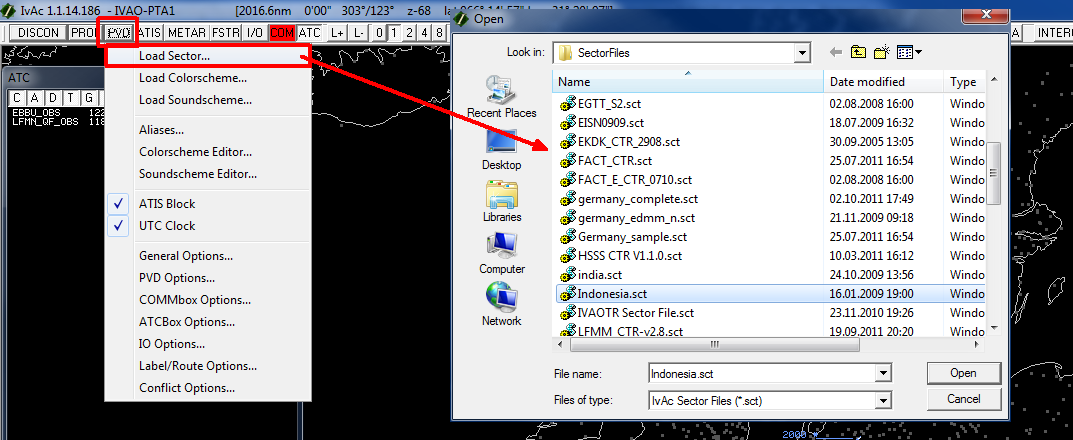 Once you have downloaded your sectorfile, you have to load it with your IvAc. Press the PVD button and then Load SectorFile and select the appropriate sectorfile.
5. First Connection
We will now connect you as an Observer at Hong Kong Airport. As an Observer, you are free to watch the traffic fly around and you may listen to active ATC. You have no duties, that means you are not in charge of any traffic yet.
Load IvAc and open the desired sector file, as described in the step above.
An important consideration before connecting to the network for the first time: Your first connections should be as an Observer, without actual ATC duties. This will help you to make yourself familiar with the software and IVAO while avoiding trouble with pilots who will contact you for a clearance sooner or later. Use the chance to listen in on active ATC frequencies and learn!
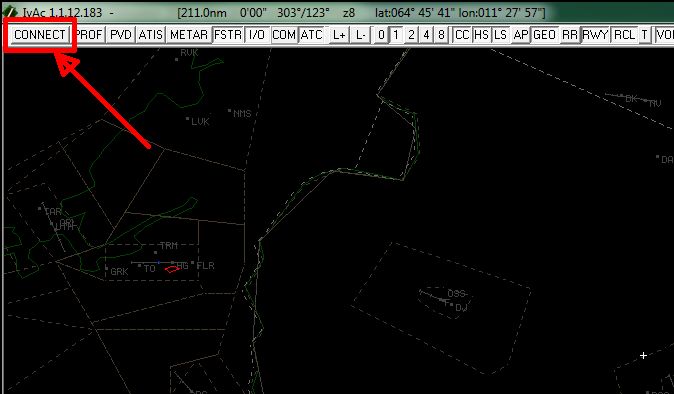
Now, press the CONNECT button.
Enter the details in the connection window:
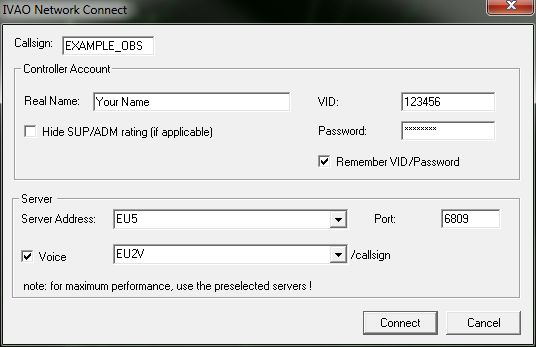
- Callsign: Your callsign. At this time, you will connect as an Observer, so the callsign can be anything, but must end with “_OBS”. We suggest you use your division abbreviation followed by your initials, for example: ZA_MR_OBS.
- Real Name: Your full name that you registered with IVAO.
- VID: Your IVAO VID that was assigned to you when you joined.
- Password: The IVAN password you were assigned when you joined IVAO.
- Server Address: The server you are connecting to. For best performance, use the one auto selected. Do not use the Training server. It is for scheduled training sessions only!
- Port: Leave this box as it is!
- Voice: Select on to have IvAc connect you to a TeamSpeak server automatically.
Once all of the above details are entered, press the Connect button.
When you have successfully connected, you will receive a welcome message in the MSG tab of IvAc’s COMMBox, and the CONNECT button will now read DISCON.
Tip: You can find the manual of IvAc on your IvAc installation folder to find answers to your questions and explore the capabilities of the program.
6. Connecting as Air Traffic Controller
Your first connection as an Air Traffic Controller on the IVAO network requires a basic understanding of the procedures employed at the place you will control. Check you division’s website for those procedures and charts for the aerodrome.
Some important things to consider before connecting to the network:
- Before connecting as an active ATC station, make sure you have the proper sector file and required documents and charts ready. Pilots will rely on you having a basic knowledge of your airspace and airport as well as its procedures.
- For your first steps it is strongly recommended that you connect as a Ground or Tower Controller at a less crowded place to get used to your new environment and duties.
Once you have prepared those items, you can attempt a connection. Use the steps as provided in the chapter “First Connection”, with these changes:
- Callsign: Enter VHHH_DEL (for a Ground Position) or VHHH_GND (for a Tower Position) accordingly.
- Voice: As it is highly recommended to use voice procedures, tick the box and select a suitable server.
As all fields are completed, press the Connect button.
Two final, but important steps:
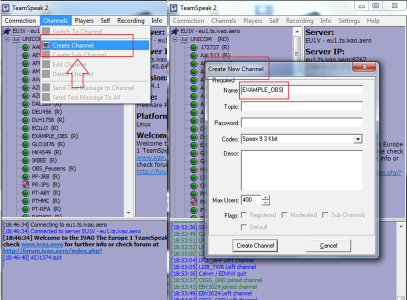
- IvAc established a connection to the selected TeamSpeak server, but did not create your ATC channel. Do so yourself by selecting Channels → Create New Channel in TeamSpeak. Enter your callsign – the same you used in IvAc! – in the Name field and press Create Channel.
- Switch IvAc to the proper frequency. Pilots will dial your ATC station’s published frequency to contact you. Make sure IvAc is tuned to it as well! To do so, select the first tab in the COMMBox and type//123.456, replacing the numbers with your frequency (DEL for 121.6 and GND for 122.55) and hit ENTER. Observe the caption of the tab change to the entered frequency.
7. Set up an ATIS
The most important information about an aerodrome is included in the ATIS. “ATIS” stands for Automated Terminal Information Service. As an ATIS transmits important status information about an airfield, it is important to set it up properly. The weather data is included automatically. You should add runway information (the current runway in use for departures and arrivals), transition altitude/transition level and if necessary some important information (like “Runway 07R closed” or “TD VOR unserviceable”).
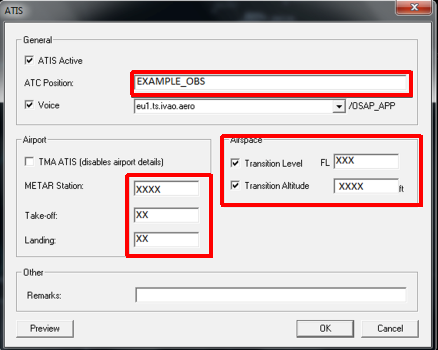
Important: Even though runways are mainly assigned by wind direction, and the transition values can be obtained from charts, actual procedures might differ. You should therefore seek information from your local division about standard procedures beforehand!
Tip: For more information about ATIS and how to correctly set up your ATIS, check the ADC Book, Chapter 3.
8. Interaction with Pilots
In general, the two most basic ATC positions here on IVAO are “Ground” (xxxx_GND) position. As a Ground controller you will be responsible for all the airplanes moving on your aerodrome surface, excluding the runways. This means that your duties will be to issue the IFR clearances and guide the airplanes from the gate to the runway and the opposite in an safe, regular and expeditious manner. For more details of your duties as controller to the various ATC positions, check for example at ATC STANDARD OPERATION PROCEDURES on our website . Examples of the phraseology used during communications can be found as well in the above link.
As a controller here on IVAO, you will use your IvAc screen to “see” the online traffic, and use voice or text to communicate with them. Below you can see an example of how your IvAc screen will look like.
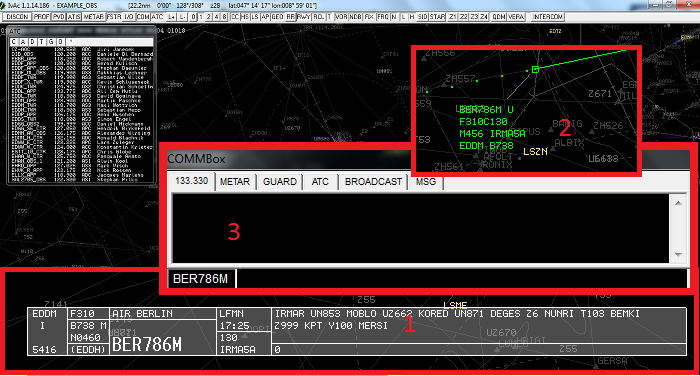
- The Flight Strip. When you select a flight, it will show a collection the most important parts of the flight plan (origin, destination, route, requested cruising flight level etc.).
- This is how every flight looks like on your radar screen – the radar target. It is composed of a small square (the actual position of the aircraft) and its label. The label consists of the most important actual information of this aircraft (current ground speed and altitude, type of aircraft and others).
- The commbox. Through the commbox, you can communicate with the pilots using text, retrieve the airport METARs, talk via private chat with other pilots or controllers (and more!).
Tip: Before you start your career as an virtual ATC, you could join the channel of other controllers and listen to the communications. This will make you more familiar to the controller’s phraseology!
Have fun! This is an incredibly addictive hobby. As soon as you start doing ATC online, you will never go back to offline ATC simulations and will wonder why you didn’t do it sooner!